

Generating software documentation with Markdown - a practical guide
17.12.2020

Almost everyone has worked at least once with rich text editors like Microsoft Word or even heard about them. Already at school, kids are using this kind of software to learn 10-finger typing. These programms ship with a wide range of tools. However, especially customizing stylesheets and layouts sometimes drives us crazy.
But instead of throwing the computer along with the text processing programm against the wall, this practical guide will tell you about a different approach. It's about the segregation of content and layout. The advantage of this attempt is, that the author can focus thoroughly on the topic he wants to present his audience. Therefore the appearence of characters, headings, etc. is neglected at first and adjusted later on.
One example for a simple markup language is markdown. Especially developers and people who work with github to publish code and write documentation or README.md files know this language. In the process of writing e.g. headings in markdown, they are not marked as such by clicking some buttons on a graphical user interface. Instead a '#' ist set in front of the text, that will later represent the heading. Later on, every content has to fit a special layout and must be prepared to hand it down to readers. This is where open source markdown converters like pandoc and julia doc become handy. Both of them will be covered in this article.
Why should you generate documentation of software systems with markdown files?
In modern software development a continuous documentation of solved issues and integrated new features is crucial. The changes in software releases have to be documented somewhere and this is where markdown and a converter like pandoc or julia doc come into play. The process of collecting all changes in the software, writing them down into a markdown file and converting them into a well organized and designed PDF is used to support the metal-stack project. To make things even better, the process of starting the conversion could be automated by making use of github actions. Triggered by a push to a special branch, a prepared github action starts to run the conversion. But this second step will be covered in a second article, coming soon.
Below, we will learn the basics about both markdown converters on their own and go into details how to work with them.
pandoc
pandoc is an open source tool to convert files from and into a different kind of format. In our use case we wanted to convert markdown files into a PDF. pandoc uses LaTeX as intermediate step in its conversion process. Apart from that, pandoc is easy to operate with command line due to his proper documentation. After successful installation on your own computer you can simply run:
code example
pandoc -s test.md --pdf-engine=pdflatex -o test.pdfto start a conversion. In this example we converted the initial 'test.md' into our destination file 'test.pdf' via the previously installed PDF engine pdflatex.
Alternatively, if you don't want to clutter your hard disk with all the TeX dependencies, you also may use a docker image for this.
code example
docker run -it --rm -v ${PWD}:/data pandoc/alpine-latex:latest --metadata title="your title" test.md -o test.pdfTo test this code snippet, it is necessary to have docker installed on your computer. Furthermore make sure to create a test.md file within a new directory. Now you have everything up and running, just navigate into the new directory and paste the code above in your favourite terminal and your PDF will be put into your current folder.
julia doc
The paragraph above covered the generation with pandoc. The same process will be explained in the following by replacing pandoc with another markdown converter called julia doc. After some research a package called Documenter.jl caught my attention. This is especially about generating documentations with julia. With native installed LaTeX or by using a docker image you are able to generate a PDF.
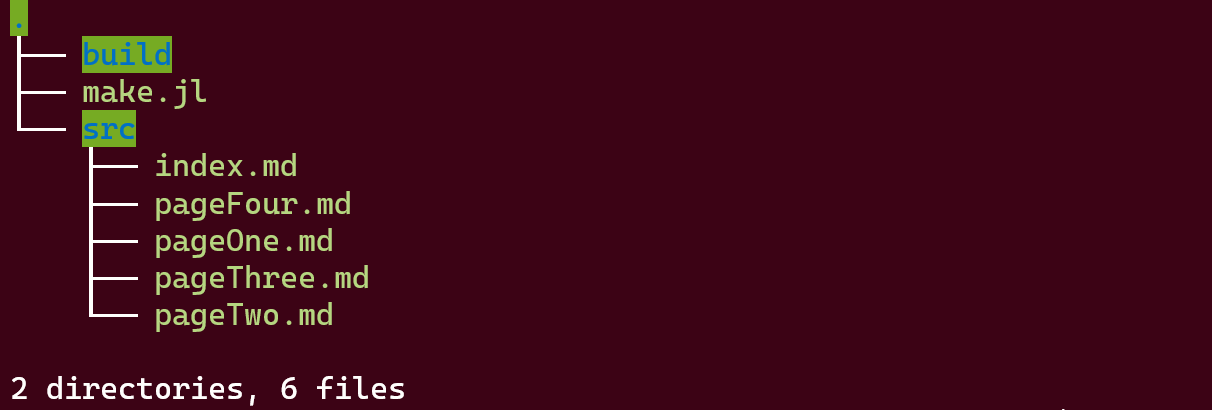
At first you have to set up a special folder structure that julia expects. Thus create a folder structure as shown in this screenshot:

Into the 'src' folder you will put all your markdown files, that you want to convert and julia will put the generated artifacts into the build folder. To tell julia what to do, we have to create a 'make.jl' file.
make.jl
import Pkg; Pkg.add("Documenter")
import Pkg; Pkg.add("DocumenterLaTeX")
using Documenter
using DocumenterLaTeX
makedocs(
    source = "src",
    build = "build",
    doctest = false,
    modules = [Documenter, DocumenterLaTeX],
    format = LaTeX(platform = "docker"),
    sitename = "TestTest",
    Authors = "...",
    pages = [
            "Home" => "index.md",
            "Manual" => Any[
                "First" => "pageOne.md",
                "Second" => "pageTwo.md"
            ],
            "Annotation" => Any[
                "Something" => "pageThree.md",
                "Something Else" => "pageFour.md"
            ]
         ]
)
For a proper conversion to PDF, julia needs the packages Documenter and DocumenterLaTeX. Therefore they are imported in line one and two. In our example we are not installing julia on our own computer. Instead we are making use of a pre-built docker image, which has a julia environment installed. At this point it is also important to tell julia to take the docker container for conversion - this is set with 'format' in line ten. Our 'index.md', 'pageOne.md', etc. files are the ones we want to convert and therefore stored in the 'src' directory as mentioned earlier. So our file structure looks like this:
conclusion
As you can see both approaches are working as aspected and doing their job properly. Altough working with julia seems a little harder at first, it is a great tool for converting markdown into PDF. If you are searching for a quick and straight forward solution, pandoc will be a good choice. In our next blog article we will take a deeper look into GitHub actions and how to integrate pandoc and julia with them.


