

Automating Github with Golang - Building your own Github Bot
06.10.2020

Users on GitHub have access to a vast API that can be used for automating recurring manual workflows on GitHub. For metal-stack, a software that provisions bare metal servers in on-premise data centers, we implemented a GitHub bot that does some useful tasks we do not want to miss anymore.
As we are big fans of the Golang programming language, we are very happy to find that it is easily possible to write such a bot in Go. Let's go implementing a minimal example for such a bot! :)
Use-Case: Managing Multi-Repository Releases
In our organization, we use the Github App bot for a bunch of workflows. An interesting use-case we currently have is managing releases for all organization's repositories. So, here is one workflow we have:
- Multiple repositories in the Github organization and on private Gitlab publish microservice releases.
- In a special repository we maintain a
release.yamlfile (see here) that holds the versions of our microservices that build an overall release of the software. - The GitHub bot receives a webhook on repository release events and adds the according release tags to the
release.yaml. - The changed file gets pushed to the
developbranch. - A pull request is opened in case there is no pull request for pulling
developintomaster. - The push to the
developbranch triggers our integration tests in a GitHub action, such that the new microservice gets integration tested right away.
As simple as this may seem, this is really saving us quite some time and effort! Of course, possibilities here are pretty much endless.
GitHub Apps or GitHub Actions
If you want to implement such an automation, you can consider building a GitHub App or a GitHub Action. GitHub Actions are becoming more and more popular for these kind of things. They are probably easier to implement because you do not need to handle GitHub authentication. Also, a big advantage is that you do not have to host an application somewhere (because the action runs on GitHub runners directly). However, GitHub Actions need to be added to repository pipelines for every project in your organization manually. You do not have a global place and thus you give the responsibility to keep everything up-to-date to the repository owners.
GitHub Apps have the advantage to receive organization-wide webhooks, such that new repositories are picked up automatically without developers having to add a special action to their pipeline workflow. So, writing a GitHub Action is what we are gonna do as I think it fits a little better to our use case.
Setting up a new GitHub App
We are hosting the application on a Kubernetes cluster because... we think Kubernetes is great! If you also plan to do this, make sure to have a DNS entry and an ingress-controller for the GitHub App in place.
In your GitHub organization settings select GitHub Apps and click on "New GitHub App".
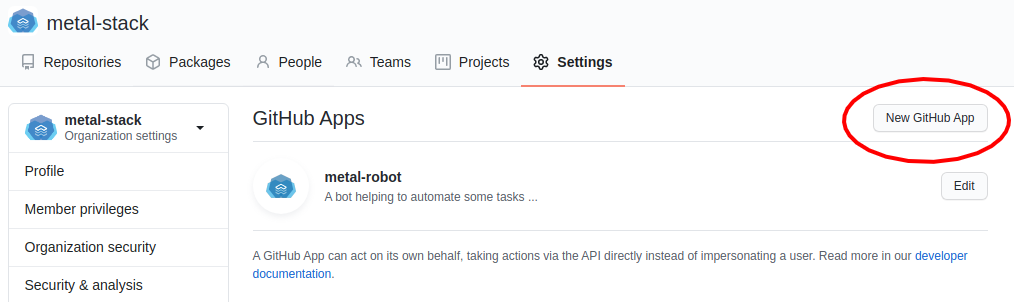
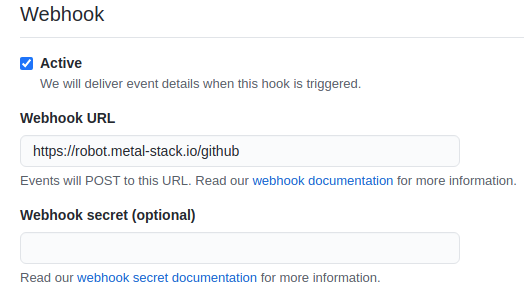
You can name the application the way you want. In our case, we called it "metal-robot". We also fill in a webhook URL that points to the place where you want to host the Github App server. In our case it's the ingress-controller deployed in our Kubernetes cluster. Make sure to also fill in a webhook secret, which gives a small enhancement on security.
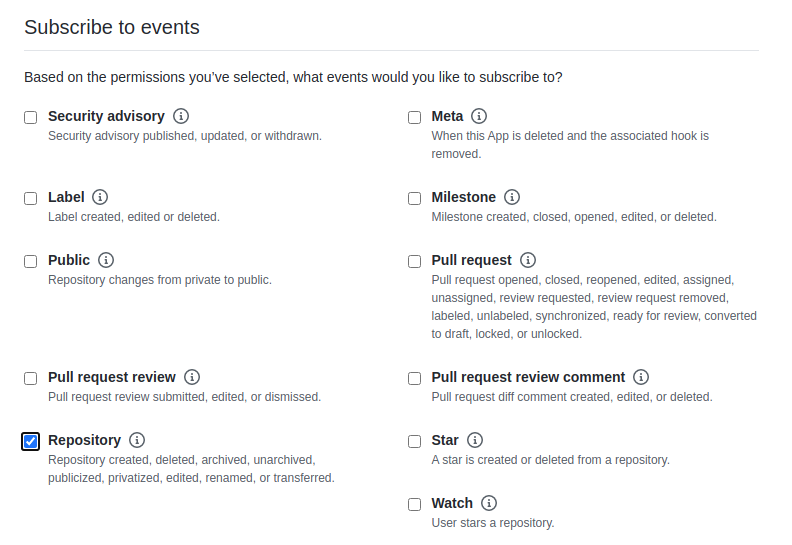
In the form, you will also need to permit the application to "Read & write" pull requests in order for the GitHub App to open pull requests. Additionally, subscribe to release events, which will be the trigger for our bot.
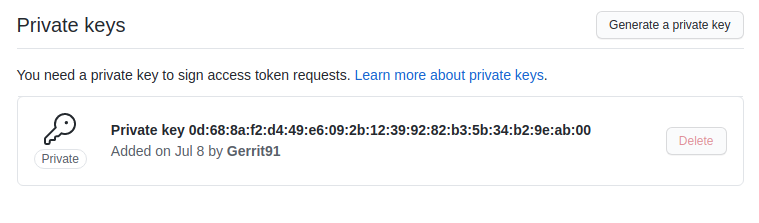
After the creation of the GitHub App, make sure to generate a private key, which is used for authenticating your GitHub App against GitHub. Also write down the GitHub App ID and the organization ID. You will need it for creating the GitHub clients.
Implementation
Now, the fun part begins. Let's create a Golang application!
For the sake of simplicity we will not implement the full use case as described above, but only an automation which creates a pull request when receiving a release event. You can lookup the complete, sophisticated sources on https://github.com/metal-stack/metal-robot at any time.
We will use some pretty useful dependencies for starting up our GitHub App, so check them out individually as well. Let's start with the following main.go.
package main

import (
    "context"
    "log"
    "net/http"
    "strings"

    "github.com/bradleyfalzon/ghinstallation"
    v3 "github.com/google/go-GitHub/v32/GitHub"
    ghwebhooks "gopkg.in/go-playground/webhooks.v5/GitHub"
)

var (
    webhookSecret = "your secret"
    appID         = int64(0) // your app id goes here
    orgID         = "your organization id"
    certPath      = "your app private cert path"

    installationID int64
    itr            *ghinstallation.Transport
)

func main() {
    atr, err := ghinstallation.NewAppsTransportKeyFromFile(http.DefaultTransport, appID, certPath)
    if err != nil {
        log.Fatal("error creating GitHub app client")
    }

    installation, _, err := v3.NewClient(&http.Client{Transport: atr}).Apps.FindOrganizationInstallation(context.TODO(), orgID)
    if err != nil {
        log.Fatalf("error finding organization installation: %v", err)
    }

    installationID = installation.GetID()
    itr = ghinstallation.NewFromAppsTransport(atr, installationID)

    log.Printf("successfully initialized GitHub app client, installation-id:%s expected-events:%v\n", installationID, installation.Events)
}
After that, we have authenticated against GitHub and we can use the GitHub clients to work with the GitHub API.
We will now also have to receive the configured Github webhooks for which we are gonna need an HTTP server.
Let's add the server to our main function and an HTTP handler function:
// ...
// add to main()
// http.HandleFunc("/GitHub", Handle)
// err = http.ListenAndServe("0.0.0.0:3000", nil)
// if err != nil && err != http.ErrServerClosed {
//  log.Fatal(err)
// }
// ...

func Handle(response http.ResponseWriter, request *http.Request) {
    hook, err := ghwebhooks.New(ghwebhooks.Options.Secret(webhookSecret))
    if err != nil {
        return
    }

    payload, err := hook.Parse(request, []ghwebhooks.Event{ghwebhooks.ReleaseEvent}...)
    if err != nil {
        if err == ghwebhooks.ErrEventNotFound {
            log.Printf("received unregistered GitHub event: %v\n", err)
            response.WriteHeader(http.StatusOK)
        } else {
            log.Printf("received malformed GitHub event: %v\n", err)
            response.WriteHeader(http.StatusInternalServerError)
        }
        return
    }

    switch payload := payload.(type) {
    case ghwebhooks.ReleasePayload:
        log.Println("received release event")
        go processReleaseEvent(&payload)
    default:
        log.Println("missing handler")
    }

    response.WriteHeader(http.StatusOK)
}
Note that we launch a go routine for processing the release event. This is because GitHub wants webhook responses to come back quickly. We handle every webhook asynchronously for that reason and just tell GitHub that we received the webhook.
Finally, we can implement our business value of our bot:
func GetV3Client() *v3.Client {
    return v3.NewClient(&http.Client{Transport: itr})
}

func processReleaseEvent(p *ghwebhooks.ReleasePayload) {
    pr, _, err := GetV3Client().PullRequests.Create(context.TODO(), orgID, "target-repository", &v3.NewPullRequest{
        Title:               v3.String("Hello pull request!"),
        Head:                v3.String("develop"),
        Base:                v3.String("master"),
        Body:                v3.String("This is an automatically created PR."),
        MaintainerCanModify: v3.Bool(true),
    })
    if err != nil {
        if !strings.Contains(err.Error(), "A pull request already exists") {
            log.Printf("error creating pull request: %v\n", err)
        }
    } else {
        log.Printf("created pull request: %s", pr.GetURL())
    }
}
Conclusion
In order not to get too far and long with this blog post, we finish it with this implementation stage. It can serve as a starting point for your own GitHub App. You should now build and deploy the application to your hosting platform to see it in action.
If you also chose Kubernetes as a target platform and you want to develop the application locally, there is another cool trick: Use the project Telepresence. It enables you to swap the Kubernetes deployment and forward webhooks from GitHub to your local machine.
Also make use of GitHub to redeliver webhooks, which is extremely handy for testing your implementation. You can trigger webhook redeliveries from the application settings in the GitHub UI.
Please find the full sources of our GitHub bot implementation on https://github.com/metal-stack/metal-robot. The repository also contains a Makefile of how we use Telepresence to develop the robot locally.
All in all, we think that the GitHub API is really powerful and spending the time on automating typical workflows for your organization is worth the effort. Happy coding!


